Tutorial: How To Use Vector Magic
There are several resources available to learn about Vector Magic. If you haven't already, we recommend viewing the videos:
Online Edition Videos Desktop Edition Videos
Overview
Using Vector Magic is super-simple:
- Upload your image. Vector Magic automatically figures out what settings to use and traces the image right away.
- Download the result! You can review the result in detail online before downloading it, and there are several tweaking options for improving it as well.
The sections below go more in-depth about the tracing options, and it can be helpful to have read them to get more background information about what the settings mean.
Image Types
The Online Edition automatically detects the image type for you. To manually override the selected option, click on 'Hand-pick Settings' in the Advanced section.
Vector Magic distinguishes between three fundamentally different input image types:
- Photos
- Artwork with blending along the color boundaries
- Artwork without blending along the color boundaries
We distinguish between these categories because they require very different types of processing.
Photos
|
|
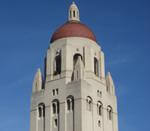
Photo
|
Photos are anything captured with a camera, including photos of artwork. Photos usually have colors that change gradually across the image, and the original was usually not an actual piece of vector art, but is rather a source of inspiration for making a new piece of vector art.
Photos are normally traced to create some form of effect, perhaps to use as the background for a larger composition, or to extract some key shape element.
Photos normally do not have sharp corners and since an artistic effect is desired, there's no single correct answer, but rather many quite possibly acceptable answers.
Artwork with blending
|
|
|
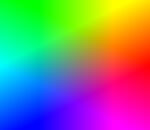
Artwork with blending
|
This is the most common type of artwork by far - in fact, if you're unsure, this is probably the correct answer. You can always reprocess your image with different settings, so don't be afraid to experiment if the results don't come out right the first time.
Artworks with blending have very important information captured in the blending - if you look closely by zooming in in the vectorization wizard, you will see that the pixels on the shape boundaries are colored in proportion to which shape they belong the most to. When zoomed out, this is what makes the curved sections of this type of artwork look smooth. If there is no blending, the curved sections usually end up looking a little jagged.
|
|
|
Vector Magic uses the information in the blending to produce more accurate results
|
Vector Magic uses the blending to make the vector result resemble the input image as closely as possible. As you can see in the figure above, Vector Magic traces out the precise location of the edge of the shape. This is something no other tracing program can do consistently, and is one of the things that set Vector Magic's results apart.
Since Vector Magic makes the most of the information in the blending, you normally do not want to posterize your input images, as is common with many other tools. Instead, specify the colors Vector Magic should use to both get the information in the blending and limit the colors present in the output.
Whenever you convert a vector image to bitmap format, you should make sure to enable the blending (also known as 'anti-aliasing') in order to get the best looking result possible.
Artwork without blending
|
|
|
Artwork without blending
|
Artwork without blending have abrupt edges between the shapes in the image (see the example image). This type of image unfortunately contains much less information about the details of the shapes than a corresponding image with blending, which means that it's much harder to recover the fine details from the original.
Notice the distinct difference at the edges of the color boundaries, when compared to the artwork with blending.
Vector Magic uses special techniques to get the most out of these images, and the techniques differ from those used in the with-blending case. It is therefore crucial to pick the right option, but if you're uncertain you can always just try one and then the other.
Artwork that look like it has meaningful blending, but actually doesn't

|
|
Artwork without and with meaningful blending. Note how the blending in the left image doesn't give a very meaningful cue to the curvature of the shape.
|
A particularly tricky case is when an image looks like it has blended edges, but the blending is meaningless. In this case the best option to use is usually 'artwork without blending'. You'll want to make sure to limit the colors used since the blending effectively becomes noise, and limiting the colors minimizes it.
This can happen when shrinking an image that did not use to have blending, but it's shrunk by only a small amount, for example to 90% of it's original size. If you shrink it by a lot, e.g. to less than 50% of it's original size, then the blending starts to become more meaningful. It's a gradual scale.
Quality/Detail Level - Artwork

|
|
Impact of the quality level setting on the shape boundaries
|
In the Online Edition this corresponds to the Detail Level setting in the Improve Result section.
For artwork, Vector Magic allows you to specify the quality level of the input image. This quality level is then used to tune the processing to get the most out of the bitmap original, and impacts the detail level in the result.
When you specify a higher quality level:
- More details are preserved when partitioning the image into basic shapes.
- The shape boundaries follow the bitmap original more closely, allowing finer details to be traced out.
This allows you to recover the finer details of your bitmap original.
Conversely, when you specify a lower quality level:
- More noise is rejected when partitioning the image into basic shapes.
- The shape boundaries follow the bitmap original less closely, smoothing them out more.
This allows you to reject most of the noise in the bitmap original, while still staying faithful to the main features present in it.
There's a tradeoff between rejecting noise and preserving detail. Experiment a little - you can use the buttons in the troubleshooting guide to quickly reprocess your image to see what the different settings do. This will let you quickly build up a feel for what type of image works best with what type of quality setting.
Detail Level - Photos
In the Online Edition this corresponds to the Detail Level setting in the Improve Result section.
For photos, Vector Magic allows you to specify the level of detail you would like to see in the output.
|
|
|


A higher detail setting means that there will be more shapes in the output, and these shapes will follow the color contours more closely.
A lower detail setting means that there will be fewer shapes in the output, and these shapes will be more smoothed out.
Vector images with more shapes take up more space, take longer to load and render, and are more difficult to manipulate, so it's a tradeoff between simplicity and fidelity. Medium is the recommended setting, as it normally gives a very good balance between looking like the original and having a reasonable number of shapes.
Colors
|
|
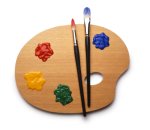
Unlimited colors
|
|
|
Custom colors
|
In the Online Edition this corresponds to the Color setting in the Improve Result section.
Vector Magic allows you to specify the colors to use when tracing your image (Custom colors). This is very useful for noisy logos, or logos that have faint outlines around the shapes, but you just want the shapes and not the outlines.
The point of specifying what colors to use, is that it helps Vector Magic produce a cleaner result that is guaranteed to have no extra colors in it. This can really help in removing crud in noisy images. If your logo has 12 or fewer colors in it, you pretty much always want to use this option.

|
|
Specifying the colors appropriately can mean the difference between a poor and a directly usable result
|
It can also be used to achieve an effect for logos with many colors, where excluding some of the colors can create a somewhat posterized feel to the result.
To help you pick the colors, Vector Magic generates a set of proposed palettes, with 2 to 12 colors in them. It then guesses which palette is the most likely and preselects that one for you.
You can pick one of the generated palettes and just go with that, or start with one of them and then modify it to suit your needs. To modify the palette, select the color you want to change and then eye-drop the color you want from the image.
Reviewing The Result
We want you to be able to know what you're going to get before you need to download anything, so the vectorization wizard has a powerful review interface. You can pan and zoom in your image, and review the result vs original side-by-side or on top, flipping back and forth between them.


